Tuesday, November 03, 2009

Auto starting and shutdown of Virtualbox VMs

Just a quickie to document a nice simple way of automatically starting and stopping Virtualbox virtual machines when you login and shutdown your Linux box.

Firstly, what is the name of virtual machine that you want to do this with?
You can list the names of your VMs in a terminal as below
$ VBoxManage list -l vms|grep "Guest OS" -B1
...and choose the name of your virtual machine.

For this example my VM is called 'Windows XP' and my host is running Ubuntu 9.10, other distros running Gnome shouldn't be much different.

To autostart your VM upon login to Gnome...

Launch System > Preference > Startup Applications, select the Add button.
Then enter a name for the program in the Name: field and in the Command field enter;
VBoxManage startvm "Your VM Name"
Replacing the 'Your VM Name' with the name of your VM, if there are spaces in the name your will need the quotes.


Lastly to have your system cleanly stop your running VMs for you when you shut down your Linux box you can edit the vboxdrv init script. To do this you will need root privileges.

You have the choice of 3 methods of stopping the VM, a poweroff, an acpi button emulation or my preference, a savestate shutdown which will stop the VM and preserve it's runtime state, it will then resume the next time it is started.

Edit the init script with the nano text editor, if you have sudo setup or if you're using an Ubuntu/Debian style Linux distribution...
$ sudo nano /etc/init.d/vboxdrv
... and enter your password.

If you don't use sudo, you can su to root before running nano or you can use su as below..
$ su root -c nano /etc/init.d/vboxdrv
... and enter the root account's password.

In nano hit [Ctrl]+[W] to search and enter SHUTDOWN in caps. This will take you line 235.

A few lines down uncomment the appropriate "SHUTDOWN=" line of choice, for example to choose a savestate shutdown edit the line;
# SHUTDOWN=savestate
to read,
SHUTDOWN=savestate
Then hit [Ctrl]+[O] to save the change, then [Ctrl]+[X] to exit nano.


This will ensure that your system when shut down will cleanly stop your running VMs without you having to do so manually.

Sunday, August 09, 2009

Make Fedora 11 unlock your Gnome keyring automatically upon login.

I love Fedora 11, it's so clean and doesn't have the crushing Intel graphics driver bugs present in Ubuntu 9.04. However one bug/feature that is really annoying is that you are made to unlock the Gnome keyring manually whenever an application attempts to access your keyring for stored credentials.
For instance if your network connection is a wireless connection using WEP/WPA encryption, the Network Manager application cannot connect after you login until you've typed in your Gnome keyring password, most annoying.

It is possible to make your Gnome keyring unlock automagically after login using the tool pam-keyring-tool.

Firstly it's often recommended that you delete your current keyrings. I don't think this is necessary as such but if you find this solution doesn't work then delete the keyrings in a terminal as follows;
 rm -f ~/.gnome2/keyrings/*  

Then in your Gnome desktop browse to System > Preferences > Startup Applications.
Select the [Add] button.
Enter the name as something meaningful such as GNOME Keyring Unlock
Enter the following in the command field;
 cat ~/.keypass | /usr/libexec/pam-keyring-tool --unlock --keyring=default -s  

Then select the [Add] button.

Finally you'll need to put your account's password in a file in your home directory..

 echo "yourpassword" > ~/.keypass  

...and set some secure permissions on the file...
 chmod 400 ~/.keypass  

Finished.

Now logout and log back in, you'll no longer be nagged to unlock your keyring.
If you deleted your default keyring file earlier, you'll have to re-enter your previously stored passwords and keys (such as your WEP/WPA key) when prompted.

Monday, February 16, 2009

Creating a local Yum repository from a DVD ISO (Fedora 10)

Someone approached me in work today with a problem, he had installed Fedora 10 in a virtual machine on our VMWare ESX server as he wanted to experiment with an Apache web server on a Linux host, however he had installed Fedora but not chosen to install the web server during the installation process and he has little experience using Linux.
He did have the the ISO file mounted as the virtual machine's DVD drive but for some reason he couldn't get the ISO file onto the Fedora virtual machine's filesystem.
The VMWare ESX server hosting the virtual machine does not have internet access, so how does he install the web server from the DVD with no internet access and no ISO file in the virtual machine's filesystem?
He approached me with a couple of printed guides he'd found on Google to ask me which one was the best approach. They were terrible, taking up pages of A4 so I knocked up the following for him...

Create and mount the ISO file 
As Fedora automounts the DVD device (/dev/sr0 under VMWare) as "/media/Fedora 10 i386 DVD" or similar we need to mount the ISO under a different mount point with no spaces in the path name, as YUM cannot support repository paths with spaces in their names.
Also as the virtual machine is not likely to ever have internet access, it'll be preferable to mount the ISO permanently as the sole active repository.
Switch user to root;
 su -  
Create the ISO file;
 dd if=/dev/sr0 of=/opt/f10dvd.iso  
 chmod 444 /opt/f10dvd.iso  
Mount the ISO file;
 mkdir /mnt/f10iso  
 echo "/opt/f10dvd.iso /mnt/f10iso iso9660 ro,auto,loop 0 0" >> /etc/fstab  
 mount /mnt/f10iso  
Setup YUM
Edit /etc/yum.conf with nano or vi.
 nano /etc/yum.conf  
Add the following lines add onto the end of the file;
 [f10iso]  
 name=local-repo  
 baseurl=file:///mnt/f10iso/  
 enabled=1  
 gpgcheck=0  
Disable the default YUM repositories
 yum repolist --disablerepo=fedora --disablerepo=updates  
Update YUM
 yum update  
You are now ready to use YUM and/or pirut or packagekit to search and install packages from the Fedora DVD ISO.
However if you setup a Fedora/Red Hat system as above and then want to start using external repositories over the internet you must disable this local repository and not use it again, otherwise you may experience some dependency problems.

Therefore if you finally get internet access on your system and you need to get YUM setup back the way it was just run the following as root...

 yum repolist --disablerepo=f10iso --enablerepo=fedora --enablerepo=updates  

Wednesday, February 11, 2009

Transcoding to your Playstation 3 with Mediatomb

The Playstation 3 is a brilliant bit of kit, not only is it a cutting edge games console but it is also a excellent media centre.
Not only does it play Blu-Rays, DVDs, CDs, MP3s and DivX/Xvid as standard through proper HDMI & optical audio connections but the rendering quality of compressed video is noticeably better than on a computer or a cheapo DivX/DVD player with richer colours and less artifacts.


The feature that is used a lot at my place is the PS3's ability to stream from a DLNA media server, this does away with the need to use physical media such as optical discs or hard disks if the audio/video files already resides on my server.
Using a streaming server can actually enhance the functionality of your PS3, something I was keen to experiment with when I first bought my PS3 about a year ago.

My DLNA server of choice is Mediatomb, this runs on my desktop machine which is also my home server, this machine currently runs Ubuntu 8.10 64bit.
Mediatomb requires some basic configuration to get the PS3 streaming from it, this entails editing Mediatomb's config file to enable PS3 support. This enables your PS3 to stream MP3s & DivX/Xvid media from your server over your network.

But what if your media is not supported by the PS3? What about ogg, flv and mkv files for instance?

Transcoding 

Mediatomb can be configured to convert certain media types in realtime and stream it to the PS3 in the format it supports, this is called transcoding.
There are many forum discussions about how to get Mediatomb to transcode various formats to PS3s however I have never been able to find a proper guide to setting up Mediatomb to transcode, just a hodge podge of partial solutions.

I managed to use some of these partial solutions as building blocks to setup my Mediatomb properly so that I can play MP3 and OGG audio and DivX/Xvid, FLV & Matroska videos upto resolutions of 1080p on my PS3 across my network. However this took a lot of experimentation and I never managed to document it so here's my chance to remedy that and knock up a guide for setting up Mediatomb on Ubuntu to transcode media to your PS3.

The Guide

Install the required software
Firstly install Mediatomb and the software required for the transcoding process along with any dependencies.

 sudo apt-get install mediatomb vlc ffmpeg ffmpegthumbnailer transcode  

Configure Mediatomb
Backup the original Mediatomb config file...

 cd /etc/mediatomb  
 sudo cp -p config.xml config.orig  
You'll need to create 3 shell scripts in /etc/mediatomb...

Script #1

 sudo nano mediatomb-transcode-audio  
Copy in the following text, save the file and exit nano ([Ctrl]+[x] then [Y])...

   #!/bin/bash  
   INPUT="$1"  
   OUTPUT="$2"  
   AUDIO_CODEC="pcm_s16le"  
   AUDIO_BITRATE="192k"  
   AUDIO_SAMPLERATE="44100"  
   AUDIO_CHANNELS="2"  
   FORMAT="s16le"  
   exec /usr/local/bin/ffmpeg -i "${INPUT}" -acodec ${AUDIO_CODEC} -ab ${AUDIO_BITRATE} -me zero -ar ${AUDIO_SAMPLERATE} -ac ${AUDIO_CHANNELS} -f ${FORMAT} - > "${OUTPUT}" 2>/dev/null  
Script #2


 sudo nano mediatomb-transcode-video  

Copy in the following text, save the file and exit nano ([Ctrl]+[x] then [Y])...


   #!/bin/bash  
   VLC_PATH="/usr/bin/vlc"  
   INPUT="$1"  
   OUTPUT="$2"  
   VIDEO_CODEC="mp2v"  
   VIDEO_BITRATE="4096"  
   VIDEO_FRAMERATE="25"  
   AUDIO_CODEC="mpga"  
   AUDIO_BITRATE="192"  
   AUDIO_SAMPLERATE="44100"  
   AUDIO_CHANNELS="2"  
   FORMAT="ps"  
   SUBTITLE_LANGUAGE="eng"  
   exec "${VLC_PATH}" "${INPUT}" -I dummy --sout "#transcode{vcodec=${VIDEO_CODEC},\ vb=${VIDEO_BITRATE},fps=${VIDEO_FRAMERATE},acodec=${AUDIO_CODEC},ab=${AUDIO_BITRATE},\ samplerate=${AUDIO_SAMPLERATE},channels=${AUDIO_CHANNELS},soverlay,audio-sync}:\ standard{mux=${FORMAT},access=file,dst=${OUTPUT}}" --sub-language=${SUBTITLE_LANGUAGE} \  
   vlc:quit  

Script #3
 sudo nano mediatomb-transcode-video-ffmpeg  

Copy in the following text, save the file and exit nano ([Ctrl]+[x] then [Y])...


   #!/bin/bash  
   INPUT=$1  
   OUTPUT=$2  
   VIDEO_CODEC="mpeg2video"  
   VIDEO_BITRATE="24576k"  
   AUDIO_CODEC="mp2"  
   AUDIO_BITRATE="192k"  
   AUDIO_SAMPLERATE="48000"  
   AUDIO_CHANNELS="2"  
   FORMAT="dvd"  
   exec /usr/bin/ffmpeg -threads 4 -i "${INPUT}" -vcodec ${VIDEO_CODEC} -b ${VIDEO_BITRATE} \  
   -acodec ${AUDIO_CODEC} -ab ${AUDIO_BITRATE} -ar ${AUDIO_SAMPLERATE} -ac ${AUDIO_CHANNELS} \  
   -f ${FORMAT} -copyts - > "${OUTPUT}" 2>/dev/null  

Remove the original config.xml file...

 sudo rm -f config.xml  

Create a new config.xml in nano...

 sudo nano config.xml  

... copy in the following text...


 <?xml version="1.0" encoding="UTF-8"?>  
 <config version="1" xmlns="http://mediatomb.cc/config/1" xmlns:xsi="http://www.w3.org/2001/XMLSchema-instance" xsi:schemaLocation="http://mediatomb.cc/config/1 http://mediatomb.cc/config/1.xsd">  
 <server>  
 <ui enabled="yes">  
 <accounts enabled="no" session-timeout="30">  
 <account user="mediatomb" password="mediatomb"/>  
 </accounts>  
 </ui>  
 <name>MediaTomb</name>  
 <udn>uuid:aa8ba7dd-5533-4ec1-b32c-b3b807677f9a</udn>  
 <home>/var/lib/mediatomb</home>  
 <webroot>/usr/share/mediatomb/web</webroot>  
 <storage>  
 <sqlite3 enabled="yes">  
 <database-file>sqlite3.db</database-file>  
 </sqlite3>  
 <mysql enabled="no">  
 <host>localhost</host>  
 <username>mediatomb</username>  
 <database>mediatomb</database>  
 </mysql>  
 </storage>  
 <protocolInfo extend="yes"/><!-- For PS3 support change to "yes" -->  
 <!--  
 Uncomment the lines below to get rid of jerky avi playback on the  
 DSM320 or to enable subtitles support on the DSM units  
 -->  
 <!--  
 <custom-http-headers>  
 <add header="X-User-Agent: redsonic"/>  
 </custom-http-headers>  
 <manufacturerURL>redsonic.com</manufacturerURL>  
 <modelNumber>105</modelNumber>  
 -->  
 <!-- Uncomment the line below if you have a Telegent TG100 -->  
 <!--  
 <upnp-string-limit>101</upnp-string-limit>  
 -->  
 </server>  
 <import hidden-files="no">  
 <scripting script-charset="UTF-8">  
 <common-script>/usr/share/mediatomb/js/common.js</common-script>  
 <playlist-script>/usr/share/mediatomb/js/playlists.js</playlist-script>  
 <virtual-layout type="builtin">  
 <import-script>/usr/share/mediatomb/js/import.js</import-script>  
 </virtual-layout>  
 </scripting>  
 <mappings>  
 <extension-mimetype ignore-unknown="yes">  
 <map from="mp3" to="audio/mpeg"/>  
 <map from="ogg" to="application/ogg"/>  
 <map from="ogv" to="video/oggtheora"/>  
 <map from="asf" to="video/x-ms-asf"/>  
 <map from="asx" to="video/x-ms-asf"/>  
 <map from="wma" to="audio/x-ms-wma"/>  
 <map from="wax" to="audio/x-ms-wax"/>  
 <map from="wmv" to="video/x-ms-wmv"/>  
 <map from="wvx" to="video/x-ms-wvx"/>  
 <map from="wm" to="video/x-ms-wm"/>  
 <map from="wmx" to="video/x-ms-wmx"/>  
 <map from="m3u" to="audio/x-mpegurl"/>  
 <map from="pls" to="audio/x-scpls"/>  
 <map from="flv" to="video/x-flv"/>  
 <map from="avi" to="video/x-divx"/>  
 <map from="divx" to="video/x-divx"/>  
 <map from="mkv" to="video/x-matroska"/>  
 <map from="mov" to="video/quicktime"/>  
 <map from="qt" to="video/quicktime"/>  
 <map from="mpg" to="video/mpeg"/>  
 <map from="mpeg" to="video/mpeg"/>  
 </extension-mimetype>  
 <mimetype-upnpclass>  
 <map from="audio/*" to="object.item.audioItem.musicTrack"/>  
 <map from="video/*" to="object.item.videoItem"/>  
 <map from="image/*" to="object.item.imageItem"/>  
 </mimetype-upnpclass>  
 <mimetype-contenttype>  
 <treat mimetype="audio/mpeg" as="mp3"/>  
 <treat mimetype="application/ogg" as="ogg"/>  
 <treat mimetype="audio/x-flac" as="flac"/>  
 <treat mimetype="image/jpeg" as="jpg"/>  
 <treat mimetype="audio/x-mpegurl" as="playlist"/>  
 <treat mimetype="audio/x-scpls" as="playlist"/>  
 <treat mimetype="audio/x-wav" as="pcm"/>  
 <treat mimetype="audio/L16" as="pcm"/>  
 <treat mimetype="video/x-msvideo" as="avi"/>  
 <treat mimetype="video/mp4" as="mp4"/>  
 <treat mimetype="audio/mp4" as="mp4"/>  
 <treat mimetype="video/x-divx" as="avi"/>  
 </mimetype-contenttype>  
 </mappings>  
 </import>  
 <transcoding enabled="yes">  
 <mimetype-profile-mappings>  
 <transcode mimetype="video/x-flv" using="vlcmpeg"/>  
 <transcode mimetype="application/ogg" using="vlcmpeg"/>  
 <transcode mimetype="application/ogg" using="oggflac2raw"/>  
 <transcode mimetype="audio/x-flac" using="audio-common"/>  
 <transcode mimetype="video/x-divx" using="video-thumbnail"/>  
 <transcode mimetype="video/x-matroska" using="video-common"/>  
 <transcode mimetype="video/quicktime" using="video-common"/>  
 <transcode mimetype="video/oggtheora" using="video-common"/>  
 </mimetype-profile-mappings>  
 <profiles>  
 <profile name="oggflac2raw" enabled="yes" type="external">  
 <mimetype>audio/L16</mimetype>  
 <accept-url>no</accept-url>  
 <first-resource>yes</first-resource>  
 <accept-ogg-theora>no</accept-ogg-theora>  
 <agent command="ogg123" arguments="-d raw -f %out %in"/>  
 <buffer size="1048576" chunk-size="131072" fill-size="262144"/>  
 </profile>  
 <profile name="vlcmpeg" enabled="yes" type="external">  
 <mimetype>video/mpeg</mimetype>  
 <accept-url>yes</accept-url>  
 <first-resource>yes</first-resource>  
 <accept-ogg-theora>yes</accept-ogg-theora>  
 <agent command="vlc" arguments="-I dummy %in --sout #transcode{venc=ffmpeg,vcodec=mp2v,vb=4096,fps=25,aenc=ffmpeg,acodec=mpga,ab=192,samplerate=44100,channels=2}:standard{access=file,mux=ps,dst=%out} vlc:quit"/>  
 <buffer size="14400000" chunk-size="512000" fill-size="120000"/>  
 </profile>  
 <profile name="video-thumbnail" enabled="yes" type="external">  
 <mimetype>image/jpeg</mimetype>  
 <accept-url>yes</accept-url>  
 <thumbnail>yes</thumbnail>  
 <resolution>128x128</resolution>  
 <agent command="ffmpegthumbnailer" arguments="-i %in -o %out -s 128"/>  
 <buffer size="524288" chunk-size="512" fill-size="1024"/>  
 </profile>  
 <profile name="audio-common" enabled="yes" type="external">  
 <mimetype>audio/x-wav</mimetype>  
 <accept-url>yes</accept-url>  
 <first-resource>yes</first-resource>  
 <accept-ogg-theora>no</accept-ogg-theora>  
 <agent command="/etc/mediatomb/mediatomb-transcode-audio" arguments="%in %out"/>  
 <buffer size="1048576" chunk-size="131072" fill-size="262144"/>  
 </profile>  
 <profile name="video-common" enabled="yes" type="external">  
 <mimetype>video/mpeg</mimetype>  
 <accept-url>yes</accept-url>  
 <first-resource>yes</first-resource>  
 <accept-ogg-theora>yes</accept-ogg-theora>  
 <agent command="/etc/mediatomb/mediatomb-transcode-video-ffmpeg" arguments="%in %out"/>  
 <buffer size="52428800" chunk-size="524288" fill-size="1048576"/>  
 <!-- <buffer size="26214400" chunk-size="524288" fill-size="1048576"/> -->  
 <!-- <buffer size="14400000" chunk-size="512000" fill-size="120000"/> -->  
 </profile>  
 </profiles>  
 </transcoding>  
 </config>  
...then save the file ([Ctrl]+[x] then [Y]).

Make the 3 scripts you created executeable.
 sudo chmod +x media*  

Lastly restart Mediatomb.

 sudo /etc/init.d/mediatomb restart  

Create some symlinks in your root directory to your media directories.
For example linking my Music, Photos, Videos and Downloads directories within my home directory would go like this...

 sudo ln -s ~/Videos /Videos  
 sudo ln -s ~/Music /Music  
 sudo ln -s ~/Photos /Photo  
 sudo ln -s ~/Download /Downloads  

Share some media

To share some media from Mediatomb, open up a web browser and goto... http://localhost:49152 You'll get the front page as below, select the [Filesystem] link...


Now select one of the symlinks you just created in the filesystem tree on the left /Videos for example, then select the "add autoscan" button.

The 'Add Autoscan' button...


Then select the options...
Scan Mode: Timed
Scan Level: Full
Recursive: ticked

Enter scan interval in seconds.


If the contents of the directory changes often and does not contain a great deal of files you may want to set this to something low like 300 seconds (5 minutes), however if the directory contains a huge amount of files (like my Music directory) you may want Mediatomb to only scan for changes every 21600 or 43200 seconds (6 or 12 hours) you could also reduce the scan level to 'Basic' to speed up scanning a large amount of files.
Once done select the [Set] button, Mediatomb will start to scan the chosen directory.

Select the next symlink in the root directory as required and repeat the process.

Playing your shared media on the PS3
Now on your PS3 run the 'Search for Media Servers' option, once found Mediatomb will show in the media menus and you can browse your shared content, videos and images will also have thumbnail previews...


All works well however you cannot scan back & forward or pause transcoded media on the PS3 as it is effectively a 'live' stream.
The only way to pause is to hit the PS button to back out to the menu, pushing the PS button again will resume playback.

Hardware Limitations
The process of streaming transcoded content to your PS3 can be a good test of your server & network hardware.
My server has a 2.1GHz Intel Core 2 Duo with 6GB of 1066MHz DDR2 RAM along with 3TB of RAIDed SATA storage.
My network hangs off a very reliable but getting old Netgear Wi-Fi G / 100Mbps Ethernet router.

My first tip will be do not bother with wireless networking.
You need some reliable bandwidth between the server and the PS3 so both need to be on a wired network.

Additionally wireless networking is slow even if your wireless network is 108Mbps, that is 108Mbps shared between all connected wireless devices.

Once I started to experiment with streaming/transcoding 8GB 1080p Matroska (.mkv) files I found that there can be limitations even on the 100Mbps wired network
during fast-action high-detail scenes (smashing glass, moving water, flocks of birds).
Pressing [Select] on the PS3 controller when playing these videos shows the video bandwidth on the top right of the screen.


Additionally when I started to test 720p - 1080p Matroska videos the 2.1 GHz Core 2 Duo was not fast enough to transcode in realtime during the fast-action high-detail scenes resulting in choppy video output on the PS3.


After much testing and changing of video bandwidths to find the sweetspot between network bandwidth and CPU load I settled on the bandwidths found in the above 'mediatomb-transcode-video' scripts and a CPU overclocked to 2.9GHz to do the job.
Therefore the suggested hardware requirements are as follows...

DLNA Server Hardware Requirements
Intel Core 2 Duo 2.9GHz or better (for transcoding proper HD videos)
100-1000 Mbps wired LAN


Enjoy!

Saturday, January 10, 2009

Truecrypt 6/7 on CentOS 5

Truecrypt is available as a Red Hat/CentOS package on RPMForge, however I found that it's problematic and only supports FAT disks. I needed to use Truecrypt to encrypt a USB drive that is going to store files larger than 4GB so FAT isn't an option.
There's many conflicting accounts on various forums on how to compile Truecrypt on CentOS 5 however the most helpful was still the README provided in the source package which still required a bit of trial and error to get a working binary at the end.
Therefore here's my walkthrough on the quickest, simplest way to get Truecrypt 6.1 compiled and working on a vanilla CentOS 5 installation.
Switch user to root.
 su -  

** UPDATE - RPMForge was merged into RPMFusion which also requires the EPEL repo on RHEL/CentOS** 
Firstly setup access to the EPEL repositories, download the latest EL5 RPM from their repo. This package just installs the EL5 repo file and the required GPG keys, install it with;
 rpm -i /pathtoyour/epel-release-5??.noarch.rpm  

The RPMFusion repository provides decent packages for fuse and wxwidgets which are required by Truecrypt, this really simplifies the process as I found setting up wxwidgets & fuse from source to be a chore.
Upto date instructions for enabling this repo is at rpmfusion.org/Configuration, the correct command-line for downloading & installing free & nonfree RPMFusion repos at time of writing is;
 rpm -Uvh http://download1.rpmfusion.org/free/el/updates/5/i386/rpmfusion-free-release-5-1.noarch.rpm http://download1.rpmfusion.org/nonfree/el/updates/5/i386/rpmfusion-nonfree-release-5-1.noarch.rpm  

Once RPMFusion is setup then install the following packages and their dependencies;
 yum install gcc gcc-c++ gnome-keyring-devel kernel-devel kernel-headers wxGTK wxGTK-devel fuse fuse-devel fuse-ntfs-3g  

Next download the Mac OSX/Linux source package from the Truecrypt website at http://www.truecrypt.org/downloads2.php and save it somewhere. In this example I've saved it to /tmp.
Now in a terminal goto the location of the archive and unpack it.
 cd /tmp  
 tar xvfz “TrueCrypt 7.1a Source.tar.gz”  

... cd to the new directory containing the extracted source code
 cd truecrypt-7.1a-source  


Download the RSA Cryptoki 2.20 header files required by Truecrypt into the source directory.
 wget ftp://ftp.rsasecurity.com/pub/pkcs/pkcs-11/v2-20/*.h   

Compile Truecrypt.
*UPDATE:  Include the NOASM flag to prevent assembly with nasm*
 make NOASM=1

The compilation process should now breeze through with no errors.
Now copy the compiled binary to /usr/bin
 cp -p Main/truecrypt /usr/bin/  
 chmod +x /usr/bin/truecrypt  

You can now start Truecypt from a root terminal.
 truecrypt  


Swapping encrypted disks between Linux & Windows systems
My requirement for Truecrypt on CentOS was for transporting sensitive data on an encrypted USB hard disk to one of our software suppliers. The guys receiving the data run Windows on their systems whereas we run HP-UX, RHEL & CentOS on our systems, Truecrypt was the only decent open-source cross-platform solution that would enable us to securely transport the encrypted data without it being too technical for the guys receiving it.
However I was a bit disappointed with how different the Windows version was to the Linux version and it became apparent that the project still needs some direction in terms of enhancing the cross-platform nature of Truecrypt.

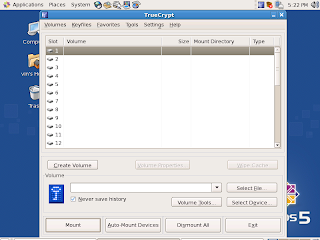
One area where this was apparent was the filesystem options available in the GUI, the Windows version only had options to create or mount FAT32 & NTFS encrypted filesystems whereas the Linux version only had options for FAT32, Ext3 & Ext2 filesystems.
If you intend to swap an encypted disk with large file support between Linux & Windows platforms, it is not possible to do this by using the Truecrypt GUIs alone.
After some time testing the best solution for this was to use a NTFS filesystem on the USB disk and encrypt the whole filesystem on a Windows platform using the GUI.
When it comes to using the encrypted disk on the Linux platform you have to mount and dismount it with Truecrypt's command-line options as the GUI does not support this.

Examples
To mount the encrypted NTFS volume on Linux;
As root substituting the 'correctpassword', the device path & the mountpoint as appropriate...
 truecrypt -t --filesystem=ntfs-3g -k "" --protect-hidden=no --fs-options=user,users,gid-users,umask=0002 -p correctpassword /dev/sdx1 /pathto/mountpoint  

To unmount the encrypted volume;
As root...
 truecrypt -t -d /dev/sdx1  
or...
 truecrypt -d /pathto/mountpoint  

What doesn't work?
  • Truecrypt on Windows will not mount an encrypted Ext2 or Ext3 filesystem, even with an appropriate Ext filesystem driver installed.
  • Truecrypt on Linux will not mount an encrypted file container, mounting a file residing on an already mounted filesystem seems to be the problem.
  • The Linux Truecrypt GUI cannot gain elevated privileges after entering your sudo password, even if sudo/sudoers is setup correctly, therefore su to root before executing the GUI from a terminal.
  • The Truecrypt GUI on Linux cannot mount encrypted NTFS filesystems