The Playstation 3 is a brilliant bit of kit, not only is it a cutting edge games console but it is also a excellent media centre.
Not only does it play Blu-Rays, DVDs, CDs, MP3s and DivX/Xvid as standard through proper HDMI & optical audio connections but the rendering quality of compressed video is noticeably better than on a computer or a cheapo DivX/DVD player with richer colours and less artifacts.
The feature that is used a lot at my place is the PS3's ability to stream from a DLNA media server, this does away with the need to use physical media such as optical discs or hard disks if the audio/video files already resides on my server.
Using a streaming server can actually enhance the functionality of your PS3, something I was keen to experiment with when I first bought my PS3 about a year ago.
My DLNA server of choice is Mediatomb, this runs on my desktop machine which is also my home server, this machine currently runs Ubuntu 8.10 64bit.
Mediatomb requires some basic configuration to get the PS3 streaming from it, this entails editing Mediatomb's config file to enable PS3 support. This enables your PS3 to stream MP3s & DivX/Xvid media from your server over your network.
But what if your media is not supported by the PS3? What about ogg, flv and mkv files for instance?
Transcoding
Mediatomb can be configured to convert certain media types in realtime and stream it to the PS3 in the format it supports, this is called transcoding.
There are many forum discussions about how to get Mediatomb to transcode various formats to PS3s however I have never been able to find a proper guide to setting up Mediatomb to transcode, just a hodge podge of partial solutions.
I managed to use some of these partial solutions as building blocks to setup my Mediatomb properly so that I can play MP3 and OGG audio and DivX/Xvid, FLV & Matroska videos upto resolutions of 1080p on my PS3 across my network. However this took a lot of experimentation and I never managed to document it so here's my chance to remedy that and knock up a guide for setting up Mediatomb on Ubuntu to transcode media to your PS3.
The Guide
Install the required software
Firstly install Mediatomb and the software required for the transcoding process along with any dependencies.
sudo apt-get install mediatomb vlc ffmpeg ffmpegthumbnailer transcode
Configure Mediatomb
Backup the original Mediatomb config file...
 cd /etc/mediatomb
 sudo cp -p config.xml config.orig
You'll need to create 3 shell scripts in /etc/mediatomb...
Script #1
sudo nano mediatomb-transcode-audio
Copy in the following text, save the file and exit nano ([Ctrl]+[x] then [Y])...
   #!/bin/bash
   INPUT="$1"
   OUTPUT="$2"
   AUDIO_CODEC="pcm_s16le"
   AUDIO_BITRATE="192k"
   AUDIO_SAMPLERATE="44100"
   AUDIO_CHANNELS="2"
   FORMAT="s16le"
   exec /usr/local/bin/ffmpeg -i "${INPUT}" -acodec ${AUDIO_CODEC} -ab ${AUDIO_BITRATE} -me zero -ar ${AUDIO_SAMPLERATE} -ac ${AUDIO_CHANNELS} -f ${FORMAT} - > "${OUTPUT}" 2>/dev/null
Script #2
sudo nano mediatomb-transcode-video
Copy in the following text, save the file and exit nano ([Ctrl]+[x] then [Y])...
   #!/bin/bash
   VLC_PATH="/usr/bin/vlc"
   INPUT="$1"
   OUTPUT="$2"
   VIDEO_CODEC="mp2v"
   VIDEO_BITRATE="4096"
   VIDEO_FRAMERATE="25"
   AUDIO_CODEC="mpga"
   AUDIO_BITRATE="192"
   AUDIO_SAMPLERATE="44100"
   AUDIO_CHANNELS="2"
   FORMAT="ps"
   SUBTITLE_LANGUAGE="eng"
   exec "${VLC_PATH}" "${INPUT}" -I dummy --sout "#transcode{vcodec=${VIDEO_CODEC},\ vb=${VIDEO_BITRATE},fps=${VIDEO_FRAMERATE},acodec=${AUDIO_CODEC},ab=${AUDIO_BITRATE},\ samplerate=${AUDIO_SAMPLERATE},channels=${AUDIO_CHANNELS},soverlay,audio-sync}:\ standard{mux=${FORMAT},access=file,dst=${OUTPUT}}" --sub-language=${SUBTITLE_LANGUAGE} \
   vlc:quit
Script #3
sudo nano mediatomb-transcode-video-ffmpeg
Copy in the following text, save the file and exit nano ([Ctrl]+[x] then [Y])...
   #!/bin/bash
   INPUT=$1
   OUTPUT=$2
   VIDEO_CODEC="mpeg2video"
   VIDEO_BITRATE="24576k"
   AUDIO_CODEC="mp2"
   AUDIO_BITRATE="192k"
   AUDIO_SAMPLERATE="48000"
   AUDIO_CHANNELS="2"
   FORMAT="dvd"
   exec /usr/bin/ffmpeg -threads 4 -i "${INPUT}" -vcodec ${VIDEO_CODEC} -b ${VIDEO_BITRATE} \
   -acodec ${AUDIO_CODEC} -ab ${AUDIO_BITRATE} -ar ${AUDIO_SAMPLERATE} -ac ${AUDIO_CHANNELS} \
   -f ${FORMAT} -copyts - > "${OUTPUT}" 2>/dev/null
Remove the original config.xml file...
sudo rm -f config.xml
Create a new config.xml in nano...
sudo nano config.xml
... copy in the following text...
 <?xml version="1.0" encoding="UTF-8"?>
 <config version="1" xmlns="http://mediatomb.cc/config/1" xmlns:xsi="http://www.w3.org/2001/XMLSchema-instance" xsi:schemaLocation="http://mediatomb.cc/config/1 http://mediatomb.cc/config/1.xsd">
 <server>
 <ui enabled="yes">
 <accounts enabled="no" session-timeout="30">
 <account user="mediatomb" password="mediatomb"/>
 </accounts>
 </ui>
 <name>MediaTomb</name>
 <udn>uuid:aa8ba7dd-5533-4ec1-b32c-b3b807677f9a</udn>
 <home>/var/lib/mediatomb</home>
 <webroot>/usr/share/mediatomb/web</webroot>
 <storage>
 <sqlite3 enabled="yes">
 <database-file>sqlite3.db</database-file>
 </sqlite3>
 <mysql enabled="no">
 <host>localhost</host>
 <username>mediatomb</username>
 <database>mediatomb</database>
 </mysql>
 </storage>
 <protocolInfo extend="yes"/><!-- For PS3 support change to "yes" -->
 <!--
 Uncomment the lines below to get rid of jerky avi playback on the
 DSM320 or to enable subtitles support on the DSM units
 -->
 <!--
 <custom-http-headers>
 <add header="X-User-Agent: redsonic"/>
 </custom-http-headers>
 <manufacturerURL>redsonic.com</manufacturerURL>
 <modelNumber>105</modelNumber>
 -->
 <!-- Uncomment the line below if you have a Telegent TG100 -->
 <!--
 <upnp-string-limit>101</upnp-string-limit>
 -->
 </server>
 <import hidden-files="no">
 <scripting script-charset="UTF-8">
 <common-script>/usr/share/mediatomb/js/common.js</common-script>
 <playlist-script>/usr/share/mediatomb/js/playlists.js</playlist-script>
 <virtual-layout type="builtin">
 <import-script>/usr/share/mediatomb/js/import.js</import-script>
 </virtual-layout>
 </scripting>
 <mappings>
 <extension-mimetype ignore-unknown="yes">
 <map from="mp3" to="audio/mpeg"/>
 <map from="ogg" to="application/ogg"/>
 <map from="ogv" to="video/oggtheora"/>
 <map from="asf" to="video/x-ms-asf"/>
 <map from="asx" to="video/x-ms-asf"/>
 <map from="wma" to="audio/x-ms-wma"/>
 <map from="wax" to="audio/x-ms-wax"/>
 <map from="wmv" to="video/x-ms-wmv"/>
 <map from="wvx" to="video/x-ms-wvx"/>
 <map from="wm" to="video/x-ms-wm"/>
 <map from="wmx" to="video/x-ms-wmx"/>
 <map from="m3u" to="audio/x-mpegurl"/>
 <map from="pls" to="audio/x-scpls"/>
 <map from="flv" to="video/x-flv"/>
 <map from="avi" to="video/x-divx"/>
 <map from="divx" to="video/x-divx"/>
 <map from="mkv" to="video/x-matroska"/>
 <map from="mov" to="video/quicktime"/>
 <map from="qt" to="video/quicktime"/>
 <map from="mpg" to="video/mpeg"/>
 <map from="mpeg" to="video/mpeg"/>
 </extension-mimetype>
 <mimetype-upnpclass>
 <map from="audio/*" to="object.item.audioItem.musicTrack"/>
 <map from="video/*" to="object.item.videoItem"/>
 <map from="image/*" to="object.item.imageItem"/>
 </mimetype-upnpclass>
 <mimetype-contenttype>
 <treat mimetype="audio/mpeg" as="mp3"/>
 <treat mimetype="application/ogg" as="ogg"/>
 <treat mimetype="audio/x-flac" as="flac"/>
 <treat mimetype="image/jpeg" as="jpg"/>
 <treat mimetype="audio/x-mpegurl" as="playlist"/>
 <treat mimetype="audio/x-scpls" as="playlist"/>
 <treat mimetype="audio/x-wav" as="pcm"/>
 <treat mimetype="audio/L16" as="pcm"/>
 <treat mimetype="video/x-msvideo" as="avi"/>
 <treat mimetype="video/mp4" as="mp4"/>
 <treat mimetype="audio/mp4" as="mp4"/>
 <treat mimetype="video/x-divx" as="avi"/>
 </mimetype-contenttype>
 </mappings>
 </import>
 <transcoding enabled="yes">
 <mimetype-profile-mappings>
 <transcode mimetype="video/x-flv" using="vlcmpeg"/>
 <transcode mimetype="application/ogg" using="vlcmpeg"/>
 <transcode mimetype="application/ogg" using="oggflac2raw"/>
 <transcode mimetype="audio/x-flac" using="audio-common"/>
 <transcode mimetype="video/x-divx" using="video-thumbnail"/>
 <transcode mimetype="video/x-matroska" using="video-common"/>
 <transcode mimetype="video/quicktime" using="video-common"/>
 <transcode mimetype="video/oggtheora" using="video-common"/>
 </mimetype-profile-mappings>
 <profiles>
 <profile name="oggflac2raw" enabled="yes" type="external">
 <mimetype>audio/L16</mimetype>
 <accept-url>no</accept-url>
 <first-resource>yes</first-resource>
 <accept-ogg-theora>no</accept-ogg-theora>
 <agent command="ogg123" arguments="-d raw -f %out %in"/>
 <buffer size="1048576" chunk-size="131072" fill-size="262144"/>
 </profile>
 <profile name="vlcmpeg" enabled="yes" type="external">
 <mimetype>video/mpeg</mimetype>
 <accept-url>yes</accept-url>
 <first-resource>yes</first-resource>
 <accept-ogg-theora>yes</accept-ogg-theora>
 <agent command="vlc" arguments="-I dummy %in --sout #transcode{venc=ffmpeg,vcodec=mp2v,vb=4096,fps=25,aenc=ffmpeg,acodec=mpga,ab=192,samplerate=44100,channels=2}:standard{access=file,mux=ps,dst=%out} vlc:quit"/>
 <buffer size="14400000" chunk-size="512000" fill-size="120000"/>
 </profile>
 <profile name="video-thumbnail" enabled="yes" type="external">
 <mimetype>image/jpeg</mimetype>
 <accept-url>yes</accept-url>
 <thumbnail>yes</thumbnail>
 <resolution>128x128</resolution>
 <agent command="ffmpegthumbnailer" arguments="-i %in -o %out -s 128"/>
 <buffer size="524288" chunk-size="512" fill-size="1024"/>
 </profile>
 <profile name="audio-common" enabled="yes" type="external">
 <mimetype>audio/x-wav</mimetype>
 <accept-url>yes</accept-url>
 <first-resource>yes</first-resource>
 <accept-ogg-theora>no</accept-ogg-theora>
 <agent command="/etc/mediatomb/mediatomb-transcode-audio" arguments="%in %out"/>
 <buffer size="1048576" chunk-size="131072" fill-size="262144"/>
 </profile>
 <profile name="video-common" enabled="yes" type="external">
 <mimetype>video/mpeg</mimetype>
 <accept-url>yes</accept-url>
 <first-resource>yes</first-resource>
 <accept-ogg-theora>yes</accept-ogg-theora>
 <agent command="/etc/mediatomb/mediatomb-transcode-video-ffmpeg" arguments="%in %out"/>
 <buffer size="52428800" chunk-size="524288" fill-size="1048576"/>
 <!-- <buffer size="26214400" chunk-size="524288" fill-size="1048576"/> -->
 <!-- <buffer size="14400000" chunk-size="512000" fill-size="120000"/> -->
 </profile>
 </profiles>
 </transcoding>
 </config>
...then save the file ([Ctrl]+[x] then [Y]).
Make the 3 scripts you created executeable.
sudo chmod +x media*
Lastly restart Mediatomb.
sudo /etc/init.d/mediatomb restart
Create some symlinks in your root directory to your media directories. For example linking my Music, Photos, Videos and Downloads directories within my home directory would go like this...
 sudo ln -s ~/Videos /Videos
 sudo ln -s ~/Music /Music
 sudo ln -s ~/Photos /Photo
 sudo ln -s ~/Download /Downloads
Share some media
To share some media from Mediatomb, open up a web browser and goto... http://localhost:49152 You'll get the front page as below, select the [Filesystem] link...
 Now select one of the symlinks you just created in the filesystem tree on the left /Videos for example, then select the "add autoscan" button.
The 'Add Autoscan' button...
Now select one of the symlinks you just created in the filesystem tree on the left /Videos for example, then select the "add autoscan" button.
The 'Add Autoscan' button...

Then select the options...Scan Mode: Timed
Scan Level: Full
Recursive: ticked
Enter scan interval in seconds.
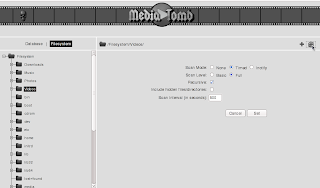 If the contents of the directory changes often and does not contain a great deal of files you may want to set this to something low like 300 seconds (5 minutes), however if the directory contains a huge amount of files (like my Music directory) you may want Mediatomb to only scan for changes every 21600 or 43200 seconds (6 or 12 hours) you could also reduce the scan level to 'Basic' to speed up scanning a large amount of files.
Once done select the [Set] button, Mediatomb will start to scan the chosen directory.
If the contents of the directory changes often and does not contain a great deal of files you may want to set this to something low like 300 seconds (5 minutes), however if the directory contains a huge amount of files (like my Music directory) you may want Mediatomb to only scan for changes every 21600 or 43200 seconds (6 or 12 hours) you could also reduce the scan level to 'Basic' to speed up scanning a large amount of files.
Once done select the [Set] button, Mediatomb will start to scan the chosen directory.
Select the next symlink in the root directory as required and repeat the process.
Playing your shared media on the PS3
Now on your PS3 run the 'Search for Media Servers' option, once found Mediatomb will show in the media menus and you can browse your shared content, videos and images will also have thumbnail previews...
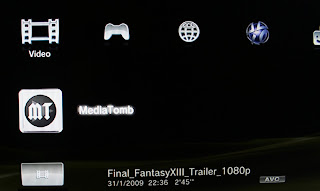
All works well however you cannot scan back & forward or pause transcoded media on the PS3 as it is effectively a 'live' stream.
The only way to pause is to hit the PS button to back out to the menu, pushing the PS button again will resume playback.
Hardware Limitations
The process of streaming transcoded content to your PS3 can be a good test of your server & network hardware.
My server has a 2.1GHz Intel Core 2 Duo with 6GB of 1066MHz DDR2 RAM along with 3TB of RAIDed SATA storage.
My network hangs off a very reliable but getting old Netgear Wi-Fi G / 100Mbps Ethernet router.
My first tip will be do not bother with wireless networking.
You need some reliable bandwidth between the server and the PS3 so both need to be on a wired network.
Additionally wireless networking is slow even if your wireless network is 108Mbps, that is 108Mbps shared between all connected wireless devices.
Once I started to experiment with streaming/transcoding 8GB 1080p Matroska (.mkv) files I found that there can be limitations even on the 100Mbps wired network during fast-action high-detail scenes (smashing glass, moving water, flocks of birds).
Pressing [Select] on the PS3 controller when playing these videos shows the video bandwidth on the top right of the screen.
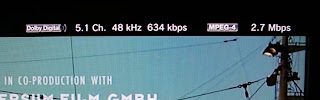
Additionally when I started to test 720p - 1080p Matroska videos the 2.1 GHz Core 2 Duo was not fast enough to transcode in realtime during the fast-action high-detail scenes resulting in choppy video output on the PS3.
After much testing and changing of video bandwidths to find the sweetspot between network bandwidth and CPU load I settled on the bandwidths found in the above 'mediatomb-transcode-video' scripts and a CPU overclocked to 2.9GHz to do the job.
Therefore the suggested hardware requirements are as follows...
DLNA Server Hardware Requirements
Intel Core 2 Duo 2.9GHz or better (for transcoding proper HD videos)
100-1000 Mbps wired LAN
Enjoy!


